 | How to Create a Program Shortcut on the Desktop |
Here is a the basic Windows way of creating (or copying) a Windows desktop shortcut:
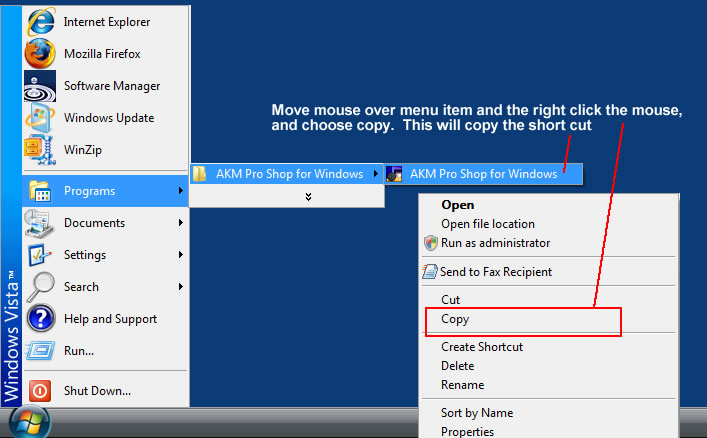
STEP 1: Click the Start Menu - > Programs -> Program Name -> Program Shortcut. While mouse is over the Program shortcut (in this example it is AKM Pro Shop for Windows), right-click the mouse and move down to "Copy" and release.

STEP 1: Click the Start Menu - > Programs -> Program Name -> Program Shortcut. While mouse is over the Program shortcut (in this example it is AKM Pro Shop for Windows), right-click the mouse and move down to "Copy" and release.

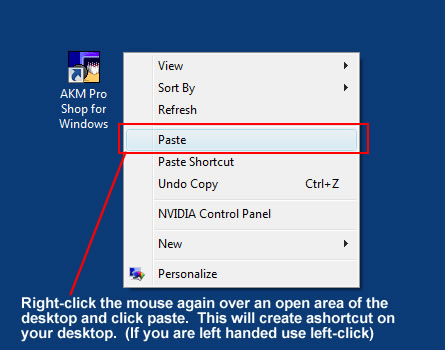
STEP 2: Next, move your mouse pointer to any empty or open space on your desktop — this means an area where there are no icons or files. Once you find a clear spot, right-click your mouse to open the context menu. From the list of options, click Paste to place the shortcut link you copied earlier onto the desktop. This action will create a clickable shortcut icon on your desktop that links directly to the program or file you want easy access to.
See illustration below:

After pasting the shortcut, you may want to rename it to something more descriptive or easier to recognize. To do this, simply right-click on the new shortcut icon and select Rename from the context menu. Then, type in your preferred name and press Enter to save the change. That’s it! You now have a custom shortcut on your desktop, making it quick and convenient to launch your program or open your file with just a double-click.